Ios Openvpn Vpn On Demand
So connecting back to my home network securely has been a fairly easy task for the last few years thanks to OpenVPN. With that, generating OpenVPN configs via the PFSense add-on openvpn-client-export and then importing them into the OpenVPN Connect app for iOS(also for Android) is also easy. But the one gripe I’ve always had is the inconsistency of the connection staying alive. I’ll connect to a wifi network or be out roaming the streets when I then notice that my VPN connection has dropped off(WTH!?). There goes some security and the point of the VPN all together. This has been important due to the RasPBX set up I have use at home that I forward my Google Voice numbers to(part of my fight against telemarkers). I use my VPN mainly for connecting back to my VOIP server so I can have a secure mode of communications(on at least my side).
As of late, I’ve been digging into options for an always on VPN solution to connect back home. I’ve attempted setting up a IKEv2 IPSec connection from my PFSense router to my iPhone with some success which I’ll explain in a post later. After many hours, I did have some success with that when I was connected to a network outside of my local network. I used the Apple Configurator and in short configured a profile which then got it on my iPhone working. The issue though was while at home connected to my home wifi, my IKEv2 IPSec connection on my phone would stop loading web traffic and would freak out. After much trial and error, I determined that this issue was most likely due to NAT. This solution was soon thrown into the trash of failed ideas.
Diving back into the issue, I kept finding reference to “VPN on Demand” or “Connect on Demand”. I’ve recently been looking at alternate options for a outsourced VPN connection for general web browsing from what I’ve been using for the last few years which has been AirVPN. After downloading and testing NordVPN on my iPhone, I notice that their VPN had the option of “Connect on Demand” under the iOS VPN settings. Enabling this I noticed that my VPN wouldn’t disconnect randomly anymore(or at least not as often). That got me thinking again. I dove back into the idea of looking into options for an always on VPN solution to connect my iPhone back to my home network.
I stumbled onto this FAQ article on OpenVPN’s website discussing VPN-On-Demand toward the bottom (See “Can I use iOS 6+ VPN-On-Demand with OpenVPN”). It was a Thursday night and I had time to burn, so I gave it a shot.
Below are the directions from the article above explained in my version that worked for me. As noted below, this setup is described using PFSense 2.4.1( as your OpenVPN Server). Note that the current version of iOS I am on is 11.1.
- If you haven’t done so already, download and install Apple Configurator 2(currently 2.5 at the time of this writing) from the Mac App Store(yeah, Mac OSX only, sorry :\ If you don’t have a mac, may look into options like this at your own risk 😉 )
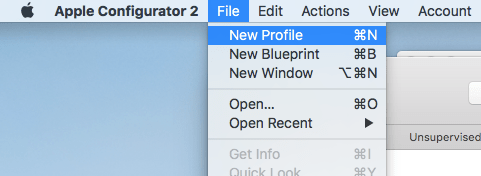
- Open up Apple Configurator, click File and then click New Profile
- Give your profile a meaningful name

- Then on the bar on the left, click VPN, which should take you to the VPN profile settings. Give it a meaningful name under Connection Name. Under Connection Type, click Custom SSL.
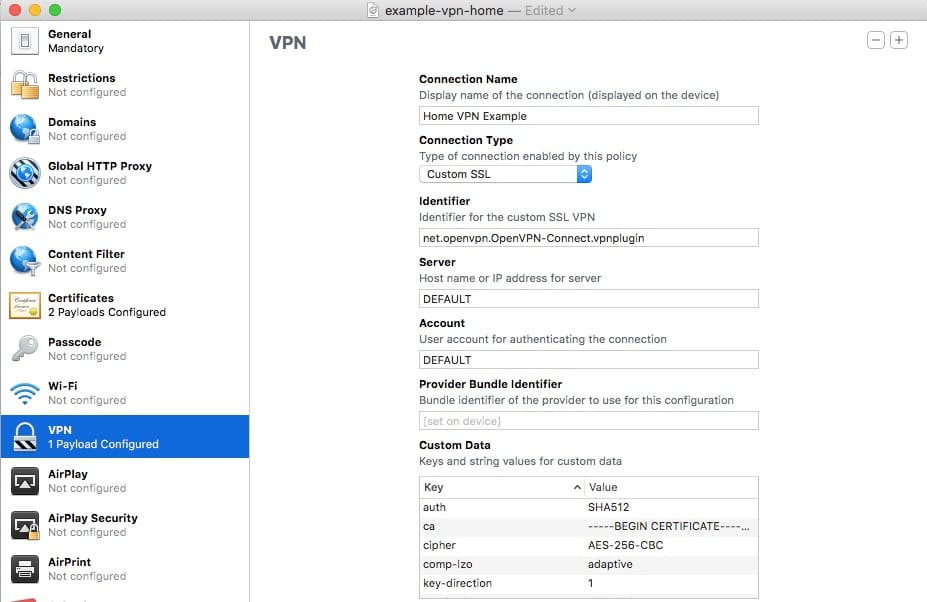 For Identifier, put the following text:
net.openvpn.OpenVPN-Connect.vpn plugin. For Server and Account, put the word: DEFAULT Provider. Bundle Identifier can be left blank.
For Identifier, put the following text:
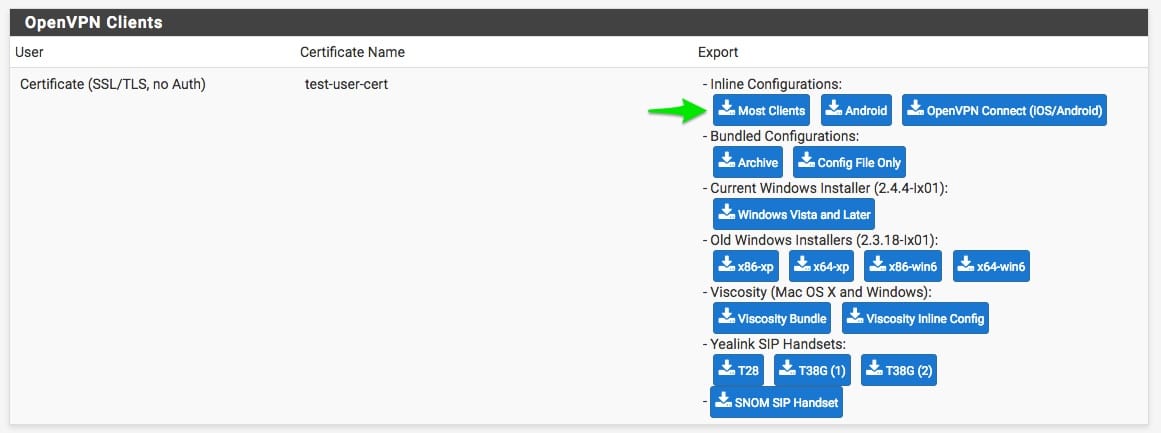
net.openvpn.OpenVPN-Connect.vpn plugin. For Server and Account, put the word: DEFAULT Provider. Bundle Identifier can be left blank. - We’re going to side track real quick. You will need to generate a OpenVPN configuration file from OpenVPN server or what not. I’m going to explain how to do it from the PFSense perspective due to its popularity and since I use it and have verified that it works.So in regards to PFSense being your OpenVPN server and you have verified that it’s been working in the past, we’ll export a configuration using the pfsense openvpn-client-export plug in that can be added on as package to PFSense. So export the Inline Configuration at the top labeled Most Clients
 Once you have download that file(which ends in .ovpn), open it up in TextEdit or another text editor(like Atom, my new fav)The top section will look something like:
dev tun persist-tun persist-key cipher AES-256-CBC ncp-ciphers AES-256-CBC auth SHA512 tls-client client resolv-retry infinite remote test.dyndns.com 1194 udp lport 0 verify-x509-name "test-server-cert" name remote-cert-tls server comp-lzo adaptive -
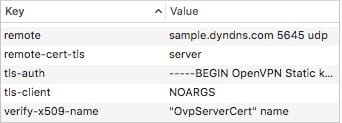
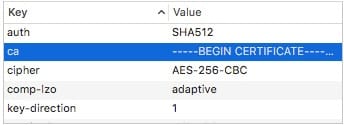
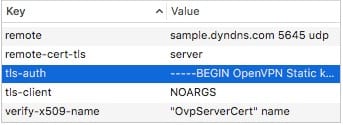
Now back in Apple Configurator, in the VPN section you were on, head down to Custom Data. We want to add the info from the top of your .opvn file into this field.You’ll have a key and a value column. So you’ll input the data from the top of your config like the following:In the key column, you’ll put: cipher
In the value column, you’ll put: AES-256-CBC For for items that that are single word like “client”, you’ll put the word: NOARGS in the value section.I found that you can ignore: dev tun, resolv-retry infinite, and lport 0 from my testings. Also, add key-direction 1 into your custom data field, this information may be located at the bottom of your .opvn file.
In my situation, here what worked for me(ignore duplicates you see):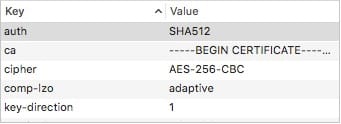

For the keys “ca” and “tls-auth”, you’ll need to got to your .opvn file and pull the certificate for your “ca” betweenand and pull the key for “tls-auth” betweenand <\tls-auth> disregarding anything with # symbols. The following is an example of the ca information from the .ovpn.  The following is an example of the tls key information from the .ovpn. 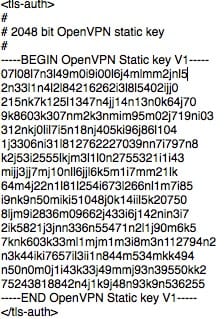 The goal is to take each one and convert it to a single line where each line break is represented with a ```\n``` I’ve created a [CyberChef recipe](https://gchq.github.io/CyberChef/#recipe=Find_/_Replace(%7B'option':'Regex','string':'%5C%5Cn'%7D,'%5C%5C%5C%5Cn',true,false,true)&input=LS0tLS1CRUdJTiBDRVJUSUZJQ0FURS0tLS0tClVDTktZVXB1Y255dXBjbnV5WllDTlBVWVlVUHV5Y255dVAzMllVUFlOQ1l1eXVZVUtDWXVueXp1a2N5em51dW4KTWpLVExxWEZMS3FES3ZCSVdBOGdOQUlORkFBUk9nSkxuSFgwa0c0aE9qS0JMcVhGTEt5RE11MTVTT1hmbEhMcgpseHVoU05Lb0xxdWFydXNROWcwTE1BT0dPSEJ2bTNCS25RRmpuUTFya0dnZUkyOWRXQldnT0FJTkZBQU5PZ3pFCkpIWDBEMUpBRHVYTFdCS2dOcUlORkFBVk9nblRGTUxPSkhMMFdMNEhORE8zV0RPaFdESzFXdEExWUZ5SE5EUzMKTktDTmtjbnZLQ05VUFVWS1ROQ1ZQVE5VVkNLVU52a2tudXRrdXZjdG52dWt0Y3Z1dG5rdmN1dG5rdnVjdG51dgprdW50dmt1Y3Rnb2JneW9zYnB1Y2NwdHV0Y3hweE5QWE54cHV2Y3hwMzJ4cFVOWHB1eGN1eG51cHhjdXhjcHVjCkpIWDBBUkJ2bTNCZElHdmNWd1hmbERPRFdMT1FLMUVPS2hXVUZRRmpuTzlHRU81TkFET0FXSzRRSzFFT01oV1IKQ0ZBcUJRRmduTk1NS0NTZ05BSVRVeUpTcmZtWEtBT0xMQUtOcXFPWktOTU1LQXlNcXFPTEtUdU5lUzJ3ZlprOQpzazhSZ1dHZk9zM3RzNzN6RHlHN0pnWktjT20rVCtUN3Z4Qm8zVVFwanpZd0JxWkJ2dERlcDQyRFVVS0lkUGx3CnkxRnhKdGdWUEI5c1I4UENhaC9TcUQrRHhTOG1UMWcrVjg3YTl0WmJQZXZ5ZG1oYmluREZseUJYRExpT24rbEMKWlZqQUxEYmZGTUJFWWI2cVRWa2ZyTDA4YjF4cTM1Y1UyZE84YUNidkdkYy9FaWhrUEhwZEdhUmxXOWMyV0NuWAo0RFVET1pvT2JlOUYvZ29XeTMxMDRVTi8vQlRoYS9aKy82eE5xV1BHRG1wUHF0dFNra2VSdUdsbkd3dE5kVEN4CmVXeGFhc3Y2cVJkeW1DeGFrK3EvdzdjL2cwVG1zU2c2YkdaMC9hVVdWb3B2Sk5QeFpIWStVYmNvZkNyNlFmUXYKTGRneS8xYU54WDhNS2dPS0trWUw5dE1MOGpLbkxxWEZSQTRPUHFBRTFZdS93QU1lVGlzSWpPTjNqYjZmcSsvMQo2NWNncWxJUUsxRW5TZ0NMYnRNTGE0S0UxWXUvd0FNZVRpc0lqT04zamI2ZnErLzE2NWVycUkrdXFJZ2dxSXVoCk1qS1RMcVhGTEtJREt2RkRXQWNnTUFJTkZBQVNPZ1RFR05PWldLMFFLMUVPTGhXUUFIRmpuUXZlV0JXZ09BSU4KRkFBVU9nelhvQ0xObDIxZ0lHNTVXQ0tnUnFJVFV5SlNyZm1YS0F1TFByUDBKSFgwQVJCdm0zQmRJR3ZjVndYZgpsRE9EV0xPUUsxRU9LaFdVRlFGam5POUdFTzVOQURPQVdLNFFLMUVPTWhXUkNGQXFCUUZnblNTTEtOS1dMcVhGClJCV09MREtOS0FSL1dLY1FLMUVuTmdBT0tnU0xMdEtYTHF1YXJ1c1E5ZzBMS0FjUEtLWU1LQU9LWmVNK2dtaVgKNHV2OEZCUkl1VGdVa0pwYnh1UmVCUnhRRXNKVnkyNVBQRmxqcm54VE1zVXp4KzRrU3BrUjh3aEdkN20rVzdzaQpZVnRONm9CRG9aemxEME10ekRlVlE2b01Mam1yWkxWK0p4WFA2Qm5mL1VFcCtqNnA3by9lam5MRjk2RDVYaDV2ClpHWVpWbkFvMlNMeWUwRUdwSU5ZbkhwYnJybGhJbHF3THoyb00zOTVqRnBPTjdFL0tIOEVYK2JVTGtSb09jVUMKSGgwT2ErcXFJRjhvbkdONHp2cmJGWmw2bXBMSGhBL0RoYVdIUzFXL2lrQkw5dkhrVjBNUTYzVGZjNG4vZUd5NAphR3dnSmN3WGJjV1IxSi9nRDEyeG45aFluQ0FnYnhXYjBaYWZSbjNqQkl3LzJ3QXhhRDhBd2NZckNLKzdKOWE5Ck1MTlRZTi9NV3cycWxnPT0KLS0tLS1FTkQgQ0VSVElGSUNBVEUtLS0tLQ) to automate this task. Seperately input your ca and tls key information in there and hit bake each time to generate a single line output. Should give your something like this for your ca(and something similar for tls): ```-----BEGIN CERTIFICATE-----\nUCNKYUpucnyupcnuyZYCNPUYYUPuycnyuP32YUPYNCYuyuYUKCYunyzukcyznuun\nMjKTLqXFLKqDKvBIWA8gNAINFAAROgJLnHX0kG4hOjKBLqXFLKyDMu15SOXflHLr\nlxuhSNKoLquarusQ9g0LMAOGOHBvm3BKnQFjnQ1rkGgeI29dWBWgOAINFAANOgzE\nJHX0D1JADuXLWBKgNqINFAAVOgnTFMLOJHL0WL4HNDO3WDOhWDK1WtA1YFyHNDS3\nNKCNkcnvKCNUPUVKTNCVPTNUVCKUNvkknutkuvctnvuktcvutnkvcutnkvuctnuv\nkuntvkuctgobgyosbpuccptutcxpxNPXNxpuvcxp32xpUNXpuxcuxnupxcuxcpuc\nJHX0ARBvm3BdIGvcVwXflDODWLOQK1EOKhWUFQFjnO9GEO5NADOAWK4QK1EOMhWR\nCFAqBQFgnNMMKCSgNAITUyJSrfmXKAOLLAKNqqOZKNMMKAyMqqOLKTuNeS2wfZk9\nsk8RgWGfOs3ts73zDyG7JgZKcOm+T+T7vxBo3UQpjzYwBqZBvtDep42DUUKIdPlw\ny1FxJtgVPB9sR8PCah/SqD+DxS8mT1g+V87a9tZbPevydmhbinDFlyBXDLiOn+lC\nZVjALDbfFMBEYb6qTVkfrL08b1xq35cU2dO8aCbvGdc/EihkPHpdGaRlW9c2WCnX\n4DUDOZoObe9F/goWy3104UN//BTha/Z+/6xNqWPGDmpPqttSkkeRuGlnGwtNdTCx\neWxaasv6qRdymCxak+q/w7c/g0TmsSg6bGZ0/aUWVopvJNPxZHY+UbcofCr6QfQv\nLdgy/1aNxX8MKgOKKkYL9tML8jKnLqXFRA4OPqAE1Yu/wAMeTisIjON3jb6fq+/1\n65cgqlIQK1EnSgCLbtMLa4KE1Yu/wAMeTisIjON3jb6fq+/165erqI+uqIggqIuh\nMjKTLqXFLKIDKvFDWAcgMAINFAASOgTEGNOZWK0QK1EOLhWQAHFjnQveWBWgOAIN\nFAAUOgzXoCLNl21gIG55WCKgRqITUyJSrfmXKAuLPrP0JHX0ARBvm3BdIGvcVwXf\nlDODWLOQK1EOKhWUFQFjnO9GEO5NADOAWK4QK1EOMhWRCFAqBQFgnSSLKNKWLqXF\nRBWOLDKNKAR/WKcQK1EnNgAOKgSLLtKXLquarusQ9g0LKAcPKKYMKAOKZeM+gmiX\n4uv8FBRIuTgUkJpbxuReBRxQEsJVy25PPFljrnxTMsUzx+4kSpkR8whGd7m+W7si\nYVtN6oBDoZzlD0MtzDeVQ6oMLjmrZLV+JxXP6Bnf/UEp+j6p7o/ejnLF96D5Xh5v\nZGYZVnAo2SLye0EGpINYnHpbrrlhIlqwLz2oM395jFpON7E/KH8EX+bULkRoOcUC\nHh0Oa+qqIF8onGN4zvrbFZl6mpLHhA/DhaWHS1W/ikBL9vHkV0MQ63Tfc4n/eGy4\naGwgJcwXbcWR1J/gD12xn9hYnCAgbxWb0ZafRn3jBIw/2wAxaD8AwcYrCK+7J9a9\nMLNTYN/MWw2qlg==\n-----END CERTIFICATE-----``` You’ll notice if you dump it into a text editor, it will appear to be on all one line, instead having line breaks. -
You’ll do that both for ca and tls keys and dump the correct information into the appropriate Custom Data “key” field.
- Moving along, your next step is to go back to PFsense to it’s certificate manager and go down to your user certificate and export the certificate file (.crt) and .key file
 You’ll then want to load up Terminal on your mac to generate a pkcs12 certificate file with exports as .pfx. Use the following command. The site I used to get this command can be found here.
 openssl pkcs12 -export -out certificate.pfx -inkey your-userkey.key -in your-user-cert.crtIt will ask you to create a password. Please remember it for the next step. -
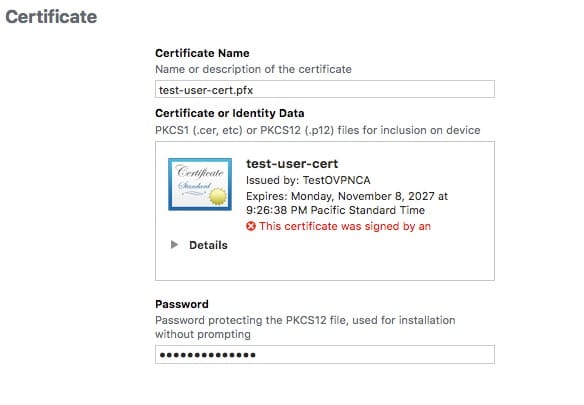
You should now have a .pfx file. Go to the Apple Configurator and click on “Certificates” on the left hand bar.
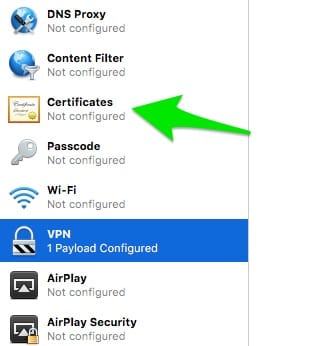
upload the .pfx file you just created. Then enter your password you created when generating that file. You should now have your user certificate uploaded.
- Now head back to your VPN settings in the Apple Configurator Profile. Under User Authentication, click Certificate from the drop down. Then go to Credential and select the user certificate your uploaded. In my case, it was test-user-cert.pfx
- For the final steps, you’ll want to enable VPN On Demand. Under Match Domain or Host, I put a wildcard * assuming it would define all websites and traffic. I haven’t determined if this actually does anything. My goal is have the VPN active for all web traffic. If there are specific websites your want to be sure to have the VPN or disabled for, you can add in those hosts or domains and chose your On Demand Action for it.
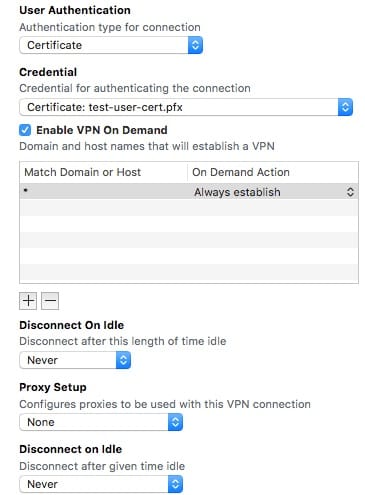
- After that, set Disconnect On Idle to Never for both and Proxy Setup according to any proxies you use.
- Now save your Profile. It is time to upload it to your phone!
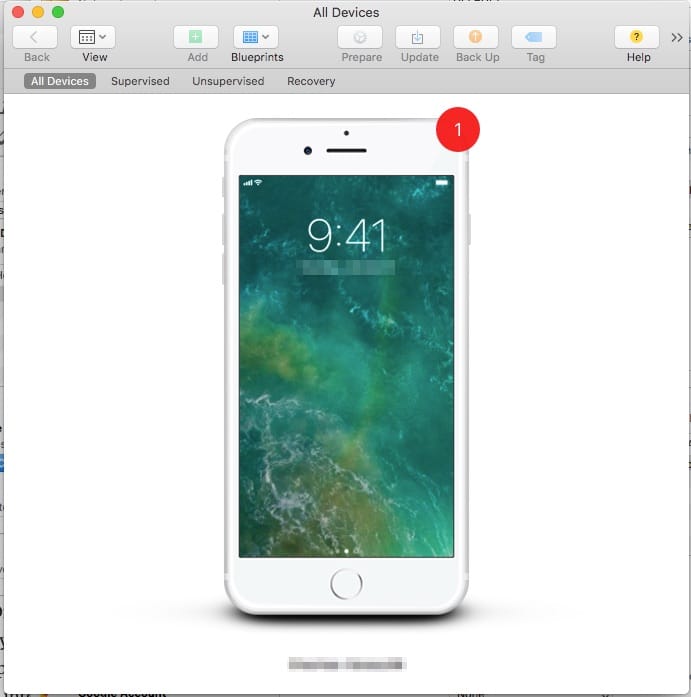
- Plug your iPhone into your Mac via USB lightning cable and unlock your phone
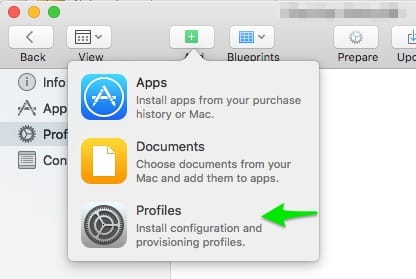
- Go to the main screen for Apple Configurator. It should look something like this:
- No click Add on the top navigation bar and select Profiles
- Then find your saved profile we just created and upload it. Make sure your iPhone is unlocked.
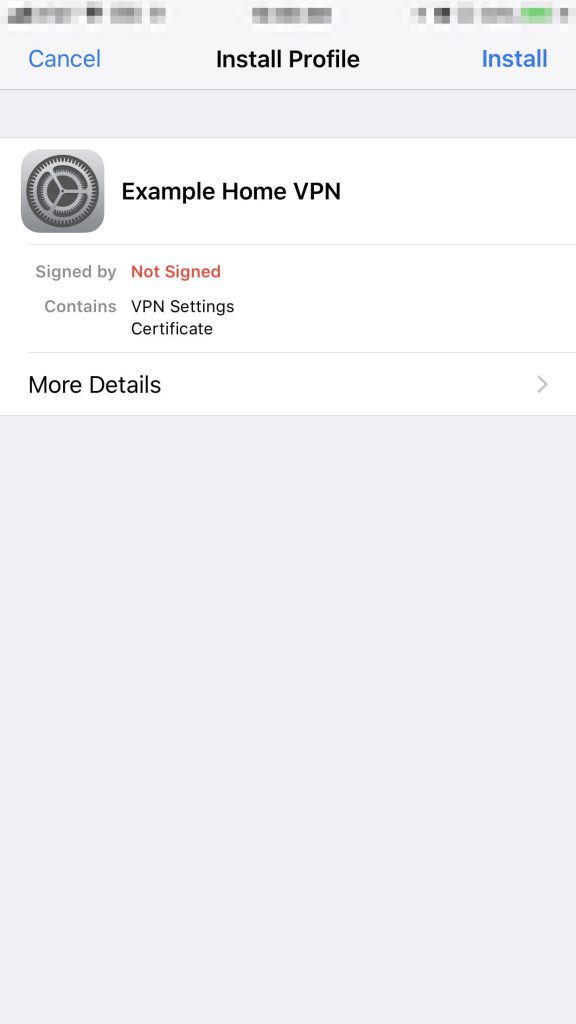
- Your iPhone will then pop up with a few messages to install the profile. Hit Install, then put in your iPhone lock screen passcode, and then click Install again. Then click Done.
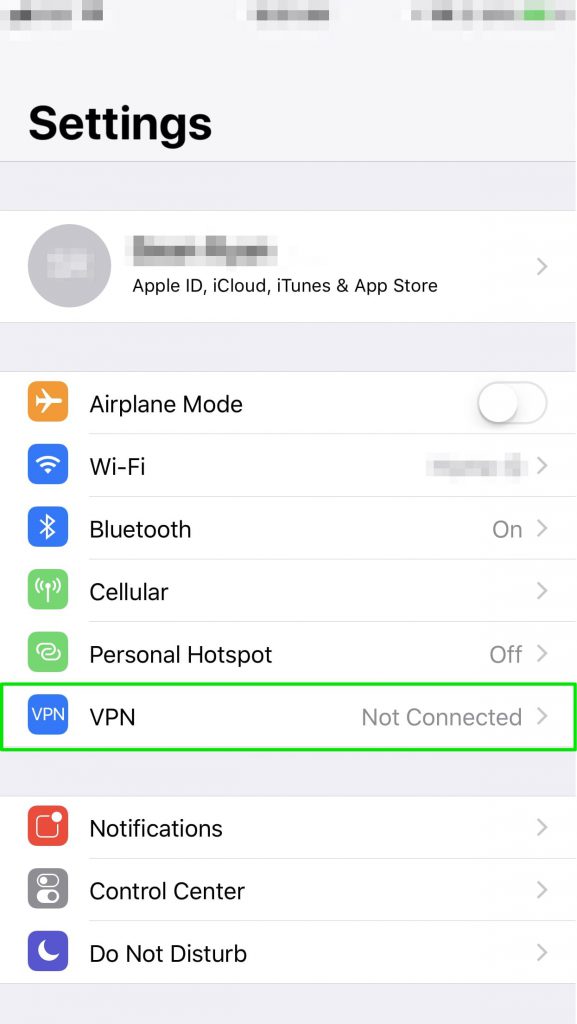
- Now that that is all complete, head to your iPhone’s main Settings Page and click on VPN.
- On the VPN select screen, select your newly created VPN and click the connection status button on the top to verify your your VPN will connect.
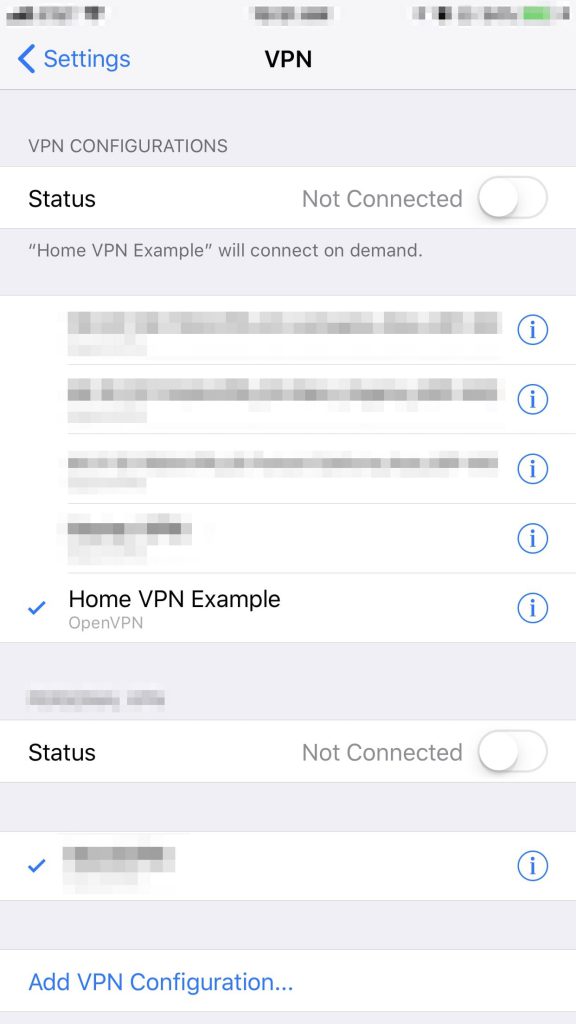
- You can click the “i” Information button to get more details. Here is where you can verify your VPN connection details like IP Address and uptime. You will also want to make sure Connect On Demand is selected.
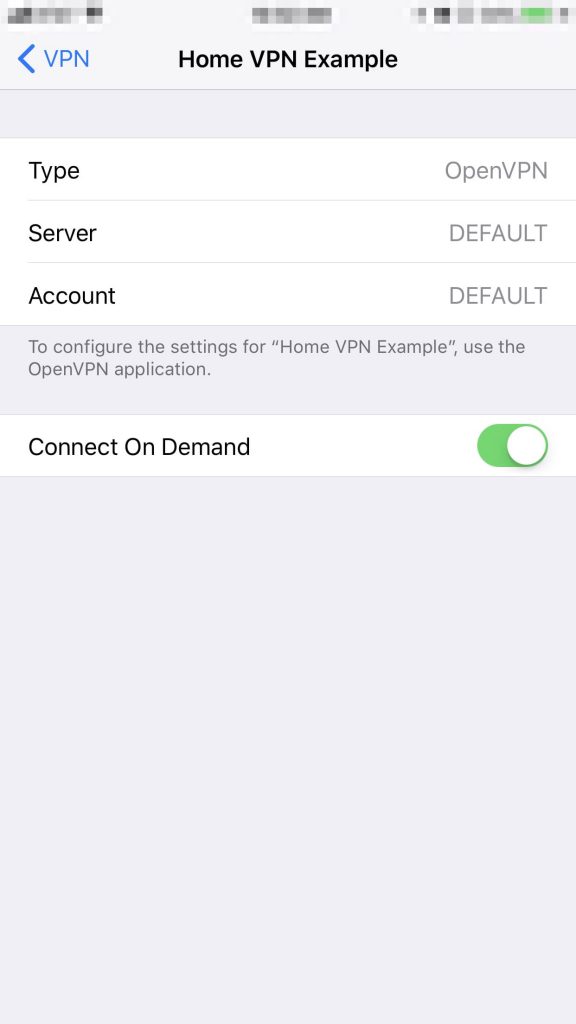 Now that you have completed everything, you should have a working OpenVPN set up that should stay active alot longer than a normal OpenVPN session typically will survive. Please check out the iOS OpenVPN FAQ page for information on further securing your OpenVPN connection. (See “What is the meaning of the various OpenVPN settings in the iOS Settings App?”) These are the settings I’m using at this time:
 If you have any comments for me or looking for possible assistance, email me at: sean[AT]seanryan.co
Comments migrated from wordpress
Sean Ryan says: November 22, 2017 at 6:16 pm
If you have any suggestions on my post, please be sure to post in the comments below
Diaan says: June 8, 2018 at 3:11 am
Oh brilliant! Thank you. I tried to follow a number of other blogs/forum posts for how to get this right but didn’t have much success, this one was right no the nose. 👍🏻 Seems a bit daft that Apple / OpenVPN / someone hasn’t invented a tool to automate this. VPN on demand seems like such a necessity to me. (Like, why would anyone ever want a VPN that disconnects before you’re done?)
Sean Ryan says: July 19, 2018 at 7:26 pm
Hey Diaan, thanks for the reply! Glad this helped you. I will be working on this some more since this isn’t complete solution. I’d personally like a fool proof(if possible) always on solution that is always tapped back to my home VPN. This may be through ikev2 or IPSEC, I’m not terribly sure. Stay tuned for some more details “hopefully” soon. 😉
Also, I’m not terribly sure if this is due to my ISP, but my internet speed when connected to my VPN is quite poor. I get about 100 mbps when I’m at home, but when I’m on my VPN on my phone, I’m getting around 2mbps, even when my cell carrier is giving me 20+ mbps (when my VPN is turned off)